• Unfinished How To: Setup the Cross Country Wireless APRS TNC Digi Tracker on Linux

    I’ve had my HAM license (SA0BWI) for about 2 years now, and still haven’t really been able to dig in.  Part of it is lack of time, and part of it lack of simple, comprehensive How-To tutorials.

    This changes now.

    Today (EDIT: this took far longer than a day!) I’ve got the time, tools, and tenacity to figure it out.  In this post, I’ll record the best, quickest, and simplest way to do it, cutting out all the unnecessary detours that lack of experience, knowledge, or guide necessitate for me.

    Ingredients:

    Computer, TNC, and Radio
    Computer, TNC, and Radio
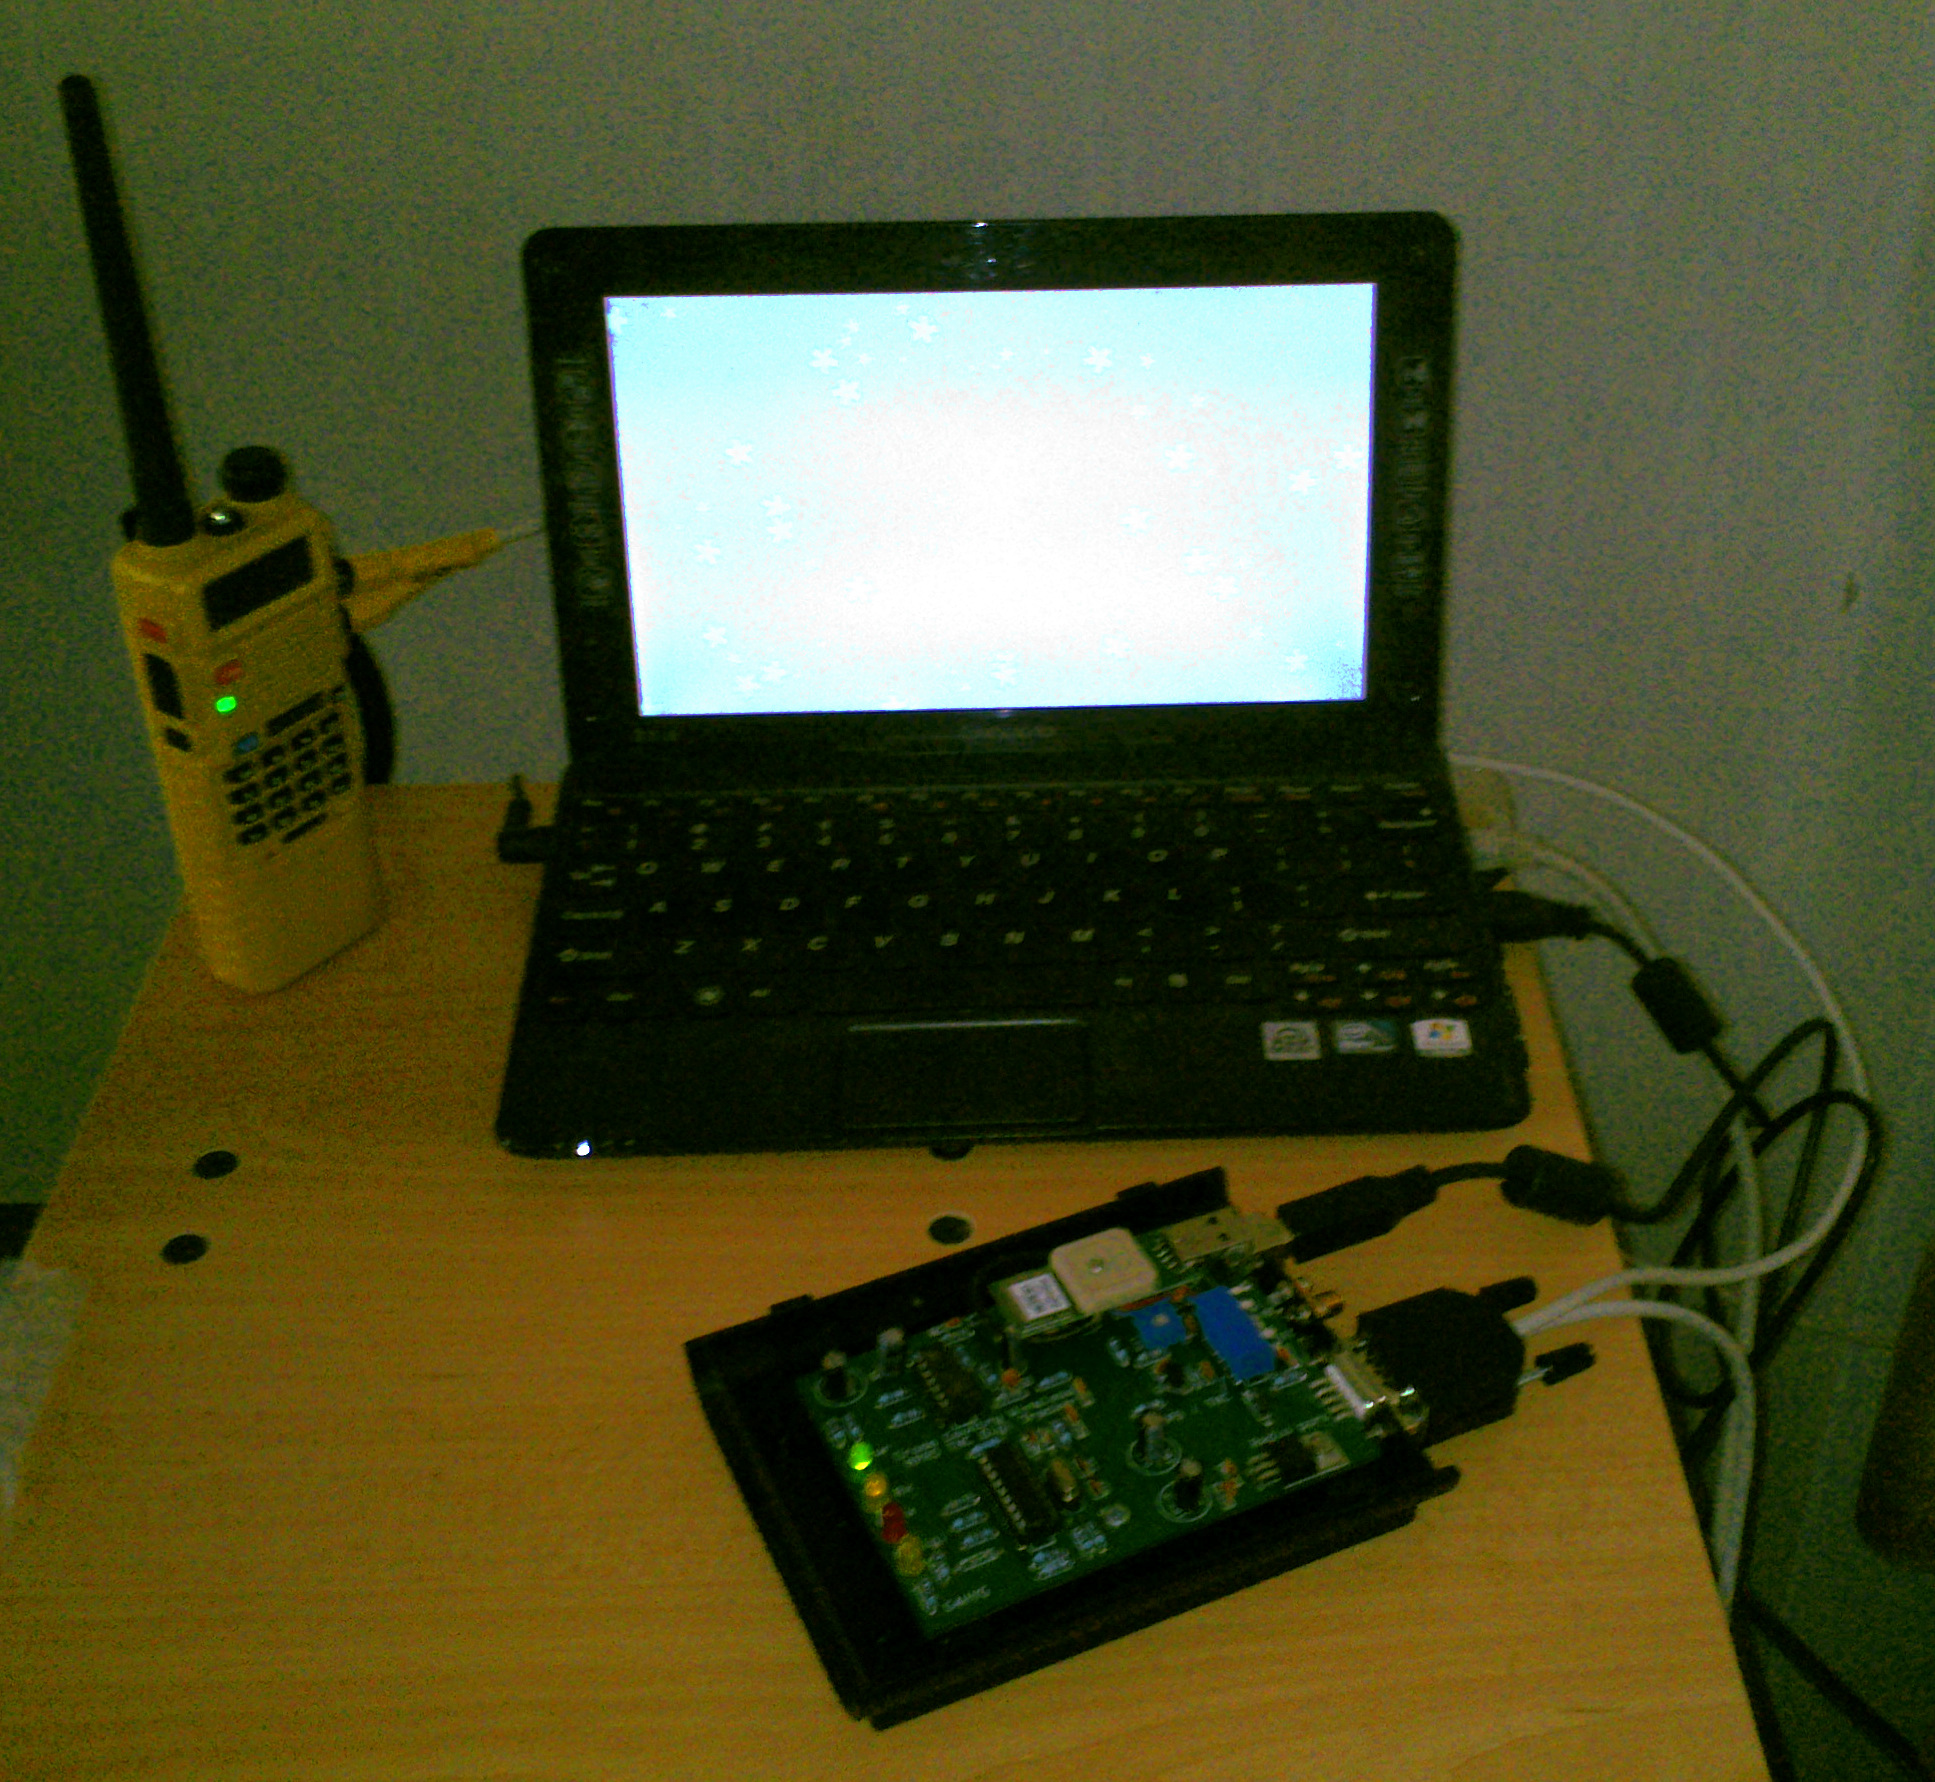
    1. Cross Country Wireless APRS TNC Digi Tracker (There are lots of tutorials for the TinyTrack, which is cheaper, but doesn’t, to my knowledge, include a built-in GPS chip.  The Cross Country Wireless device which I have has a GPS chip, a higher price tag, more options, and fewer tutorials for Linux.)
    2. Radio (I use a Baofeng UV-5R).  Having two radios will help – one for working with, and one for monitoring.
    3. Computer (in my case, a Lenovo S10-3s for now, but I plan to switch to a Raspberry Pi sometime in the future – anything remotely modern with a USB port will do.)
    4. Linux (I use Linux Mint XFCE edition.  The commands in this post should work on any Debian-derived distro.)
    5. Cabling to connect your radio to the TNC (custom wiring, you can order it at the same time as the TNC or make it yourself – according to Chris Moulding over at Cross Country Wireless, it needs a 4.7nf capacitor in series with the audio input to the TNC), and the TNC to the computer (USB B to A connector – the same as used by most printers)

    Configure the Radio

    1. Set Squelch (SQL in the radio’s menu) to 0 – fully open
    2. Set Transmission Power (TX POWER) to LOW (when you’re done setting everything up, you can change it to high to cover a larger area)
    3. Set Voice Detection (VOX in the menu) to OFF
    4. Set Bandwidth (WN in the menu) to NARROW (May not be necessary, but narrow is the path to the future!)
    5. Set Dual Watch (TDR in the menu) to OFF
    6. Set BEEP to ON (Doesn’t seem right?  May have to do with this bug.)
    7. Set R-DCS to OFF (To be honest, I don’t know if this matters.)
    8. Set R-CTCS to OFF (To be honest, I don’t know if this matters.)
    9. Set T-DCS to OFF (To be honest, I don’t know if this matters.)
    10. Set T-CTCS to OFF (To be honest, I don’t know if this matters.)
    11. Set the radio’s human impersonator (VOICE in the menu) to OFF
    12. Set PTT-ID to OFF
    13. Set BCL to OFF
    14. Set SFT-D to OFF
    15. Set OFFSET to ZERO
    16. Set Squelch Tail Elimination (STE in the menu) to OFF
    17. Set Repearter STE (RP-STE in the menu) to OFF
    18. Set Repeater Squelch Delay (RPT-RL in the menu) to OFF
    19. Set ROGER to OFF
    20. Finally, set the frequency to 144.800 MHz (European APRS frequency)

    Configure the TNC

    Calibrate the Radio Volume

    With the radio connected to the TNC and the TNC ON, increase the volume until the Rx LED glows steady, or almost steady.  You might have to set it at full blast.

    Note that I had two different behaviors with my two TNCs: one would glow bright at extremely low volume, and a tad dimmer at moderate to loud volumes; I set this one to a moderate volume.  The other wuold flicker constantly, increasing in brightness with the volume; I set this one to a high volume.

    DIL Switches

    The first thing to do is set the switches to the right settings.  Here’s what I used during setup:

    1. ON: Radio Port Power
    2. OFF: Selects Terminal Operation
    3. ON: PTT Output
    4. ON: PTT Output on audio (HT-specific)
    5. ON: GPS Receiver (NOTE: You will want to turn this off once we’ve established communication with the device.)
    6. OFF: Not used anyway
    7. OFF: Sets Transmit Audio Level Low
    8. OFF: Digipeater Off

    Software Configuration – Minicom

    Cross Country Wireless has done a great job with their TNCs, and bundles software for using and configuring them, called APRS Messenger.  There’s only one problem: it’s for Windows.  Yes, there are solutions like Wine, which may or may not work, but I prefer to avoid that.  Therefore, I use Minicom.

    Next step is to program the TNC with your callsign and set up other parameters.  To do this, we need to download a serial communication program and connect to the TNC through it.

    Plug the TNC into the computer via USB.  I found the instructions over at CyberCiti.biz very helpful to establish the serial connection.  Find out what the COM port device is:

    $ dmesg | grep tty

    Mine ended up being ttyUSB0

    The next thing to do is install minicom:

    $ sudo apt-get install minicom

    For some reason, the version of mincom that my package lists had was not available on the server, so I had to download the .deb package manually from this URL: http://archive.ubuntu.com/ubuntu/pool/universe/m/minicom/

    I followed CyberCiti’s guide to using minicomNOTE: I used sudo because minicom needs write permission to /etc/ to save the configurations we make below.

    $ sudo minicom -s -c on NOTE: the -c on is just to make it display with pretty colors, and can be omitted safely.

    (Screenshot)

    I went to Serial Port Setup and made the following changes:

    (Screenshot)

    • A: Serial Device to /dev/ttyUSB0
    • E: COM port settings: I changed to 4800 8N1, as recommended by the APRS TNC Digi Tracker Manual, by pressing C B L V W.  Depending on your firmware, you may need 9600 baud.
    • F: Hardware Flow Control: No

    On advice of someone over at Texas Instuments, I cleared all the modem and dialing settings.

    (Screenshot)

    All that done, I chose “Save Setup As…” and gave the name TNC1.

    (Screenshot)

    Then I chose to “Exit from Minicom” as I wanted to run it in a non-SUDO environment.

    Re-start minicom with our saved configuration file by running:

    $ minicom TNC1 -c on

    Note: you may be given an error something like “cannot connect to ttyUSB0″.  If this happens, it’s because your user doesn’t have access to /dev/ttyUSB0, so you need to change the file ownership to give your user access by:

    $ sudo chown username /dev/ttyUSB0 (of course, change “username” to your username).

    If you are lucky enough, you will be treated to a scrolling list of GPS chip output:

    (Screenshot)

    If you’re not so lucky, you might see gibberish instead of the GPS chip outputs.  If this happens, re-edit minicom’s configuration files and change the baud rate.

    Now, unplug the APRS TNC Digi Tracker, and change the DIL Switch 5 to OFF.  This will get the GPS chip to quiet down so we can talk to the device.  Plug it back in, and you’ll see something like:

    (screenshot)

    Software Configuration – the TNC

    Time to explore the device!  For a quick configuration of all necessary points, run the following commans.  NOTE: you should change some of these when you have figured out that all is working, particularly the beacon timing and beacon text!

    You’ll save time by referring to Appendix 2 in the manual, which lists all the commands in their proper syntax.

    cmd: mycall SA0BWI-9  (of course, change to your call sign and SSID)
    cmd: unproto aprs-0,wide2-2  NOTE:  If you haven’t fully understood APRS Paths, take a look at this video.
    cmd: btext >Testing 123...
    cmd: beacon every 1
    cmd: mon all
    cmd: digi on
    cmd: myalias wide1-1
    cmd: echo on
    cmd: txdelay 64
    cmd: gps gprmc

    Calibrate the TNC Transmit Volume

    You should probably do this on an unused frequency, not on the normal APRS frequency.

    With everything plugged in, minicom open, and access to the TNC, turn on another radio to monitor.

    Put the TNC in calibration mode by using the CAL command in minicom.  You should hear a continuous tone on the monitor radio.

    Using a flat head screw driver, play with the potentiometer on the TNC circuit board (almost underneath the GPS) until you find the sweet spot: loud enough to be audible, quite enough to not trigger any peak reduction.

    Use the space bar to toggle the tone and find the sweet spot again.  Basically, find a sweet spot that works for both tones, and keep that.

    Testing 123…

    At this point I wanted to do some testing, just to be sure that I could send and receive packets.  I duplicated the setup with another computer, TNC, and radio, and tried to send messages back and forth using the Converse mode (see the manual).  No luck: sending seemed to work fine, but receiving wasn’t working at all.

    I had a call with Chris Moulding, and had feedback from the Yahoo Group https://uk.groups.yahoo.com/neo/groups/cross_country_wireless/conversations/messages/4164

     I’m posting this so that I can share with the group and get their feedback.


  • HOWTO: Install JellyBean on Sony Xperia U (Unlocked Bootloader)

    Despite the fact that I use technology a lot, I’m actually one of those people who doesn’t like Cell Phones.  I use them as little as possible.  In fact, I have written articles summarizing the heath hazards in current scientific literature, which I will post here some day, and used to actively discourage my friends from using them.

    So it’s probably a surprise to many friends that I’m using a cell phone… on top of that, a smart phone!

    Why I got it is a long story.  In short, I found myself, in quick succession, almost lost in three cities in various parts of the world, without an address where I was supposed to go, and without access to my email, maps, or friends.  Everything worked out, of course, but I saw the benefit of having a small computer in your pocket.

    Well, perhaps I should say that I found a plausible excuse to compromise my scruples and invest in the latest of gadgetry…  that’s not the whole truth, but to be honest, it is a part.  I held out as long as I could, but once I saw the benefits, I took the plunge, and bought a Sony Xperia U.

    Why the Xperia U?  To be honest, the main attraction was the nice colored LED bar.  It also had a convenient size that was not too far from a “normal” cell phone size, had some good features, and had a discount.

    The Xperia U, when I bought it, was running Gingerbread.  As soon as I could, I changed to a custom Ice Cream Sandwich ROM, called XPerience v2, without unlocking the boot loader.  It did me quite well, but for some reason (maybe it was the huge amount of apps that I installed) it got very slow, and very buggy, till last week, I had no alternative, I had to change something.  It took 5 minutes to boot, and I often missed calls because the display wouldn’t wake up in time.

    Now the question was: do I unlock the bootloader or not?  Previously, I had not unlocked it because I didn’t want to void the warranty, and also I wanted to have access to some of the Xclusive Xperia wares, such as that app that identifies the song.  Well, now after more than a year with the thing, the warranty is void anyhow, and I have never once used that app.  So I decided to bite the bullet and unlock the bootloader.

    This decision was aided somewhat by the fact that even after 3 hours, I couldn’t re-install ClockWorkMod on the locked bootloader!  I had managed before, but this time there was some strange version mis-match between the Android Debugger on my phone, and the one on the computer.

    So here, in this blog post, I am providing a step-by-step guide to reset your phone to factory defaults, unlock the bootloader, install CWM, and finally install the ROM of your choice.  There are a number of ways to do this; the path outlined here is not necessarily the easiest, nor the quickest, but it worked for me.

    The fact is, there’s a lot of How-to guides out there, so this How-to is basically going to say “Click, Follow Instructions”.

    Step 1: Get Ready

    You need:

    1. Your Xperia U ST25i (that’s what I had)
    2. A working computer with Windows XP or 7 (yes, I did this on Windows.  You can try on Linux, it might work, I have no idea!).  I don’t recommend using WIndows ME, Vista, or other such variant, as they are more than full of bugs, and something might go wrong.  Something might go wrong anyway!  You have been warned…
    3. The USB cable to connect your phone to your computer.
    4. A good internet connection (preferably, other than your phone).
    5. A bunch of software tools.
    6. Patience, and the willingness to sacrifice your phone to the Gods of Chance.

    Backup your stuff and prepare a blank slate:

    1. Boot Windows, connect the phone to the computer, turn on and unlock the phone, and wait till the dust settles, drivers install, etc.
    2. If you haven’t already, install PC Companion so that you can browse the files on your device.
    3. Copy everything from your phone to a backup folder on your computer.
    4. Do a factory reset on your phone by following these instructions. Come back when you’re done!
    5. When it’s booted up again, go through the little intro, don’t bother connecting to your Google account, and enable USB Debugging in Settings > Developer options.

    Download some tools:

    1. The Xperia FlashTool.  Install it by running that file (don’t worry, it doesn’t have a virus that I’m aware of).
    2. Install the drivers, by going to the folder where FlashTool was installed (C:>Flashtool/drivers) and run the driver installer.  Select the driver for Xperia U, and the two drivers at the bottom of the list, and install them.
    3. And that’s the only tool you really need.

    Download the software for your phone:

    This one is a little tricky: there’s no central repository for hosting these files, so you usually have to go through a number of links, flashy advertisements, etc, clicking on the wrong download buttons, etc.  But it can be done!

    1. Download the .54 version of firmware for the Xperia U, by following the links on this page.  The one you want is called ST25i_6.1.1.B.1.54 GENERIC – user_Sony
    2. Download the Memory Tweak kernel from this page.  That is what I used, but you may want to Download the CWM kernel for the Xperia U, from one this page instead.
    3. Download the ROM of your choice from the lists at this page.  (I used CM10, but might switch to Paranoid Android).

    Some things you need to know:

    1. With the phone off, hold the volume down button and plug into the computer.  The LED bar will light up green, and the phone is now in FlashTool mode.  This is used to flash the firmware from .ftf files.
    2. With the phone off, hold the volume UP button and plug into computer.  The LED bar will light up blue, and the phone is now in FastBoot mode.  This is used to flash kernels from .img, .sis, and .something else files.
    3. With the phone off, turn it on.  Once you see the Sony logo, press the volume down button quickly and repeatedly.  The Indicator LED will flash different colors, and the phone will boot into Recovery mode, once you’ve gotten CWM installed.
    4. If you brick your phone (it’s not working anymore), put it in Flashtool mode and re-flash the stock firmware (the first thing that you downloaded above).  In the worst case scenario, I had to remove the battery, let it sit for a while, and then it went into fastboot mode.  Usually, you can always recover the phone this way.
    5. By now, the phone’s battery should be fully charged.
    Step 2: Complete Stock Reset

    Next we will reset our Xperia U to completely stock configuration: Sony software, nothing more.

    1. Disconnect the phone from computer, say goodbye to its current OS, and shut it down.

    Run FlashTool.

    1. Click the flash (thunderbolt icon) button in FlashTool, choose FlashTool mode, and click OK.
    2. Click on the “…” button, and browse to the folder where you downloaded the Stock .54 firmware, and click Open.
    3. The ROM will show up in the available ROMs list.  Choose the right one, and click “Flash”.
    4. Follow the directions.  Instead of using the back button, use the volume down button, to put the phone in FlashTool mode.
    5. When it finishes, it will tell you to unplug the phone and start it up.
    6. Start up the phone, it will boot very slowly.  The first boot is always slow.  After it’s booted, it will show the setup wizard, and then the LED will start to flash and it will show you the Factory Setup Screen.  Click Power Off.
    7. It will shut down eventually.  Turn it on again.  It’s much faster this time!When it’s booted up again, go through the little intro, don’t bother connecting to your Google account, and enable USB Debugging in Settings > Developer options.
    8. Now you have a practically brand new phone!
    Step 3: Unlock Bootloader

    Here you can bite the bullet, and unlock the bootloader.  Or, you can branch out and find how to root your phone without unlocking the bootloader (yes it is possible!).  If you go that way, skip this and the next step, root and install CWM on your own before going to the final step.

    1. FlashTool should still be open on your computer.  If not, open it!
    2. With your phone on and debug mode enabled, plug it into the computer.
    3. In FlashTool, click the BLU button (BootLoader Unlock), and follow instructions.  It’s a little complicated, you have to get an unlock code from Sony, but it’s an easy process.
    4. Continue to follow the instructions in FlashTool.
    5. Finally, it will tell you to unplug and start your phone.
    6. Turn on the phone, wait patiently, turn off at the factory setup screen, turn on again, go through the wizard.
    7. Now you have a practically brand new UNLOCKED phone!
    Step 4: Root and Install CWM
    1. Unzip the Memory Tool file to a folder in your computer.
    2. Rename the “ftr” file to “Memory_Tweak.img”.
    3. FlashTool should still be open on your computer.  If not, open it!
    4. Turn off phone, and boot it into FastBoot mode.
    5. Click the Flash Icon, choose FastBoot mode, click OK.
    6. Click “Select Kernel to Flash”, find “Memory_Tweak.img” and click OK.
    7. Close that dialog.  Behind it, the memory tweak kernel has been flashed.
    8. Follow instructions, if any.
    9. Unplug the phone, and turn it on.  As soon as you see the Sony logo, press the volume down button quickly and repeatedly.
    10. It should boot into CWM (Recovery).  You can use the power button to enter, volume up/down for moving up and down, and the camera button for back.  Power off for now.
    Step 5: Install the ROM of your Choosing

    You are now free!  You can install ANY ROM you want, through CWM, which is the preferred way to install ROMs.

    If you chose above not to unlock the bootloader, then you are not so free: you can only install ROMS that are marked as OK for locked bootloaders.  If by mistake you flash the wrong ROM, just repeat this tutorial.

    1. Turn on the phone, go to the OS, enable USB Debug mode (if it somehow got disabled).
    2. Plug the phone into your computer, and go browse the device.
    3. Copy the ROM’s zip file that you have downloaded to the internal storage.
    4. When it’s finished copying, shut down the phone.
    5. Follow the instructions from where you found your ROM.  This is usually to boot into recovery, run some cleaning scripts, and then flash the ROM.  It’s pretty self-explanatory.
    6. When it’s done, power off and boot into your new ROM!  (Remember that the first boot usually takes a long time).
    7. Congratulations!


  • CrisisCommunicator Development: now Easier than Ever Before!

    Issue #24 over on the CrisisCommunicator GitHub pages has been assigned to me for a couple weeks now; but it’s finally cleared up.  The issue description was simple enough: write the instructions for installation.

    As with all programming, it got more complicated from there.

    Previously, I had written a script called Adorno (announcement here), which allows Python / Django beginners to quickly and (relatively) effortlessly set up a professional development environment, including:

    • VirtualBox
    • Vagrant
    • Git
    • Heroku (for Git-based online hosting)
    • PythonBrew (to maintain separate versions of Python)
    • VirtualEnv and VirtualEnv Wrapper (via VirtualEnv Burrito)
    • and finally, pip.

    Setting up all that stuff can take a novice days, and can be enough to scare anyone away.  At the very least, novices will “make do” with only part of the above, usually skipping VirtualBox, Vagrant, and Git, using PythonBrew only if absolutely necessary, and perhaps not even bothering to install VirtualEnv.  That’s a pity, because their life could be so much easier with those tools!  (I know… I’m guilty!)

    Well, Adorno solved that for me.  It was a nice script that I could use to easily set up those things, and was geared for people just starting their Tango with Django.

    What does that have to do with Issue #24?  Well, I reasoned, if Adorno could setup for Tango with Django, it shouldn’t be too difficult to expand it, so that developers could use it to easily install their Django projects in development environments.  I needed to abstract the project-specific customization into a separate configuration file, which could be tailored for every project.

    Very long story short, with some great help from IRC user Riviera (who introduced me to ShellCheck – a great error-checker and best-practice resource for your shell scripts) it’s done!  (Well, it’s working.  Riviera gave me a long list of homework, which will be done, I promise!)

    Getting started with CrisisCommunicator development is easier than ever before.  Head on over to the how-to, and start coding!

    If you have your own project, feel free to include a <project_name>_adorno.sh script file in the root of your repository.  Check the Adorno repository for a guide (use tango_adorno.sh – it’s very simple).

    I hope it’s useful, and that the development of the CrisisCommunicator increases!


  • Compress PDF for College Applications

    It’s always a rush: the deadline is approaching, there’s exams coming up, you are applying for a chance to study in your dream college next year.  As you near the end of the application form, they always want soft-copies of your certificates, in PDF.

    And of course, the online application always has some ridiculously low file size limit.  They often have file number limits too, meaning that you have to combine your scanned certificates all into a single PDF.

    Recently, I was applying for a Ph.D. where I must upload all my certificates, supporting documents, SOP, filled application, etc. as a single PDF file.  And of course there was an unrealistically small size limit.  For another application, I could upload three documents, but they must all be less than 2MB.  Yet another application required that the PDF file have all pages rotated to the correct orientation.

    How is a full A4 certificate or transcript, two pages, full color, scanned at 300dpi, supposed to fit in 2MB?!?  My PDF, all told, was 13MB, and about 5 pages (Bachelor’s certificates, MSc certificates, diplomas, etc).  And it had to fit in 2MB???  I assume that it should also be legible?

    Well, the answer is, yes, we can!  The answer to all your PDF worries is ImageMagick and PDF Tool Kit (aka pdftk) – wonderful life-saver programs present on most GNU/Linux systems.

    Not on Linux?  My friend, my friend, it’s time to free yourself!  Download Linux Mint and give it a spin!  You can even run LinuxMint from the DVD, just for the purpose of using PDF Tool Kit, if you’re that desperate.

    Still not on Linux?  Well, you can always use Adobe Acrobat Pro, but it is costly!  I happen to have a licensed version of Adobe software, which I do use on occasion.  However, more and more often, I don’t need to use it because there’s a perfectly fine free, open source alternative.

    Well, if you’ve come here looking for answers on “How do I compress my PDF?”, I shouldn’t keep beating around the bush.

    Compress your PDF of Scanned Documents:

    There are a number of solutions you’ll find via Google.  I’ve tried them all, with little success.  Finally, I found a command that actually works:

    convert -density 300×300 -quality 5 -compress  jpeg input.pdf output.pdf

    Change input.pdf and output.pdf to suit your needs.  I have found that (surprisingly!) using a quality of 5 usually is legible.  You can increase it up to 100.  I usually convert the big file once using this command, take a look at it, and increase the quality if the file is under the size limit, or decrease if it’s too big.

    There’s a lot more that ImageMagick can do for you.  To see some more examples, check out CatlingMindSwipe (including how to convert a JPG into a PDF).

    Re-organize / Rotate pages in a PDF file:

    Another task usually involved in submitting applications is rotating your PDF files, chopping out pages that you don’t want to send, or combining many PDF files into a single PDF.

    Yes, there are a number of online sites that will combine files for free, edit them, etc., but why would you use them?  There’s a better way to do this, right at your finger tips!

    PDF ToolKit (from now on, just pdftk) lets you do all this in a very nice, simple interface.  To know the full power, just type “man pdftk”, and be overwhelmed with the power suddenly in your control!  For a quick start, read on:

    Scenario: You scanned your certificate, and saved it as a PDF, but it’s sideways.  You need to rotate it.

    pdftk A=input.pdf cat AE output output.pdf

    Explanation: You read the input file to A, then you put A in the cat’s dish, then you rotate it towards the East (picture the document sitting on a compass rose), and then out output it to output.pdf.  It might sound strange, but cat actually doesn’t represent a feline, it’s short for concatenate, or join-files-together.  Here, you’re joining A (rotated to the E) with nothing, so it’s just A.  You can also rotate a document West (W), or to the South (S).

    Scenario: You need to upload a bunch of certificates, but can only upload one file.  Let’s use that cat!

    pdftk A=input1.pdf B=input2.pdf C=input3.pdf cat A B C output output.pdf

    Now cat makes sense!  Basically, you’re just joining A, B, and C into one file, output.pdf.

    You can have as many input files as you need (I’ve gone all the way to L).  If you get strange errors, and you’re pretty sure that the command was correct, then one of your PDFs might be malformed.  Try removing one input file at a time from the command until it works, then you know which one was the culprit.  If you are joining huge documents, you might get out of memory issues: just join them into two bunches, and than join the two bunches with another command.

    Scenario: You need to extract some pages of a book to send your writing sample.  For the example, let’s say you need to extract pages 2-10.

    pdftk A=input.pdf cat A2-10 output output.pdf

    That’s it!  Quite simple!  We can make it more complicated… say that, on top of that, you need to rotate the pages 90° to the west (you scanned them the wrong way):

    pdftk A=input.pdf cat A2-10W output output.pdf

    Scenario: You need to do all the above!

    pdftk A=writing_sample.pdf B=scanned_Diploma.pdf C=transcript.pdf cat A2-10W BE C output My_Documents.pdf

    This takes your scanned Writing_Sample.pdf, extracts pages 2-10, rotates them to the West so that your reviewers can read it online without cricking their necks, then rotates your Diploma East for the same reason, and tacks on your transcripts, all into a single file that you can upload called My_Documents.pdf!

    If My_Documents.pdf is too big, try compressing it using the convert command (above).

    Good Luck with your applications!  What’s your favorite way to handle PDFs?


  • The Case for Dark System Themes: How to Save your Eyes and Use a Computer at the Same Time

    When I was young(er than I am now), I didn’t like black deco.  I thought it was evil.  I thought that a computer, used for word processing, should always have a white background just like a sheet of paper.  I thought that the command prompt with it’s white text on a black background was archaic.

    And I was in good company.  Even Apple seemed to agree with my sense of UI deco.

    Then I started to use a computer.  I started to really use a computer, like 10 to 12 hours a day, eight days a week.  I quickly discovered that staring at little shadows on a big square light bulb was not good for my eyes.

    This made me completely reconsider my sense of digital UI deco, and to collect a set of tools to help me reduce eye strain.  I present them here as that’s what this blog is for!

    System Theme

    Always find a plain black theme.  Not a black theme with fancy accents that makes your window trim look like it was painted and waxed in a Porsche Body Shop; a matte black with minimal fanciness is the best.  In KDE, I use the Oxygen-Dark theme.  I’ve also downloaded other theme components that provide green accents rather than blue.  I prefer black and green, especially when I’m running Linux Mint.

    Edit: Firefox has always been troublesome on a dark theme, because if the website doesn’t include full styling for text fields and form input elements, it will mess up their display.  This page shows you an easy and excellent way to fix that: http://ubuntuforums.org/showthread.php?t=1715031

    Note: I’ve never had luck with LibreOffice and a dark system theme.  When I need to do anything that needs to see colors, I have to change the system theme temporarily.  Does anyone know a solution?  EDIT 2014 02 06: It works!  See below:

    Office Apps

    LibreOffice / OpenOffice can work, even in Dark Themes!  If you do a lot of word processing in Writer, then this won’t help you save your eyes, but it will help you see the document as intended.

    Do this:

    • Open LibreOffice or OpenOffice
    • Tools > Options…
    • LibreOffice > Accessibility
      • UNcheck the option to automatically detect high contrast mode
    • LibreOffice > Appearance
      • Make the document background White, instead of Automatic (or a shade of gray to reduce eye strain)
      • Make the application background gray, to reduce the contrast between the white paper and the dark borders
      • Make the font color Black.
    • Click OK, quit Office, and open it again.  Now your presentations and spreadsheets will work as they should.


    RedShift or F.Lux

    These two tools (you only need one of them) tint your computer screen towards warmer colors based on the time of day.  The “white” light emitted from your monitor can be described in terms of color temperature, a measurement in Kelvin.  Basically, a “low temperature” white, say 5000K, will have a “warm” redder color, while a “high temperature” white, around 7000K, will have a “cool” bluer color.

    The important point here is that the color of your monitor should match the color of the ambient lighting to reduce eyestrain.  For a typical office with warm light bulbs and sufficient windows, the ambient light color will go from warm in the morning to cool at midday, and back to warm.  RedShift makes the assumption (and is generally correct) that this is the case, while F.Lux has a more complicated configuration to match any ambiance.

    If you’re using a laptop, then I recommend RedShift as a good general case, as staring at a warm colored monitor while in a room lit by cool lighting is not half as straining as the other way around.  On the other hand, if you are at a fixed computer with predictable ambient lighting conditions, then install F.lux and configure it to perfection.

    On Linux, either of these programs can be downloaded from the repository.  Install redshift and gtk-redshift (the control panel), and configure it to auto start when you log in.  Make sure your system clock is set to the right time zone and location, redshift will do the rest.

    Note: You will want to disable these tools when you are doing color-sensitive work, previewing images, and watching movies for the best results.  It’s usually simple: just click on the icon near the clock in your system tray.

    Invert

    I used to use Compiz, which had a most wonderful feature: I could invert the color of any window I was looking at.  This is only really useful if you are reading a PDF: black on white.  Invert the window, and you have white on black!  Much better for the eyes.  Now my system no longer has Compiz, and the new compositors don’t seem to have that live-saving feature.  Hopefully it will come back…

    Regular Breaks

    Regular breaks (every 20 or 25 minutes or so) where you stare at some very distant object, such as the scene out the window, do wonders.  I must confess I’m not the best at following this particular piece of advice.


    Well, there you have it!  My toolkit for reduced eye-strain, and longer productivity.  Enjoy!

    You may ask: Why is this website all black-on-white?  The truth is that I haven’t yet overridden the default CSS to switch it to white-on-black.


  • Adorno: Embellishing your Tango with Django

    UPDATE: It seems that the version that I published to GitHub at the time of writing this post didn’t work properly.  Now it’s fixed, and works like a charm!

    I have been following the excellent Tango with Django online book over Christmas and New Year.  I’m hoping to be able to contribute more meaningfully to the CrisisCommunicator project.

    Previous to Tango with Django, I followed all of the tutorials at Getting Started with Django.  I really appreciate those tutorials, as the author (Mr. Kenneth Love) goes out of his way to show you the current “best practices” in Django development.  I wish he had been able to finish his series!  As it is, I’m addicted to his approach, using excellent programs like Vagrant to create a really great development environment.

    In Tango with Django, a different development environment is used.  I wanted to continue using Vagrant and Heroku, and I wanted a quick-reference script that I could use to create more development environments easily.

    So Adorno was born.  Adorno is a bash shell script to help set up a Vagrant box with the necessary tools for easily coding in Python. It is especially helpful for people following the Tango With Django series. The README also serves as a quick and simple command reference for beginners like myself.  It works independent of your operating system, because it runs in the Vagrant virtual box.

    Adorno makes it really simple to set up a development environment and get you ready for Django coding.  Spend less time setting up, and more time coding!

    Find it in my GitHub account:

    http://github.com/swiftarrow/Adorno

    Enjoy!  I hope it’s useful to people.


  • Launching New Website: Linkesh.net

    New Website!  During my SELECT graduation program at TU/e Eindhoven, my classmates and I had a session on self-promotion.  The session facilitators (Ontwerp Onderhoud, Tamara Derksen, and Marjolein Hins) stressed the usefulness of owning our domain names.  I was inspired, and this site is the result!

    It had been on my mind to re-start my own website for a long time.  Previously, I had built a site at http://s227842398.onlinehome.us/ (still online!) and used it as an experimental platform to learn Drupal features.  Sadly, that site has languished for want of attention.  Eventually, I intend to migrate the note-worthy content from that site to this.

    I intend to use this site as my online resumé, central location to link to my projects, and a collection of technical notes, articles, and links to things that you may find useful.

    For the technically inclined, this site is running on a fully-responsive fluid theme called Customizr.  I would really like to update the CSS to have a nice dark theme, like that on my old site.  Suggestions?  Please comment!

    With luck, this site will become a useful resource.

    Stay tuned!